Dear All,
If you are facing a problem to deploy SharePoint through one way, Than Here I am writing different ways to deploy the Customized Web Part Under SharePoint Portal
Here we go....
When you are done developing a WebPart, you need to deploy it to the SharePoint server. However, depending on your server setup, you may have to use specific deployment methodology and that is why it is important to know your options. This post describes different ways to achieve this goal.
Basic understanding
Whatever method you use to develop your WebPart, you will always end up with a WebPart DLL and in some cases you will have WSP file (both of these files are in debug folder of your project). It is the DLL file that plays a key role in getting your WebPart inside SharePoint server.Ways to deploy a WebPart
There are more ways but i mentioned here four ways we can deploy a WebPart on SharePoint server that I will cover in this post:- Using Visual Studio to deploy the solution
- Manually moving the DLL to the server
- Uploading WSP to SharePoint server
- Deploying through command prompt
- Through Power shell for this please refer my following post (http://bvs-sharepoint.blogspot.com/2015/02/power-shell-scripts-to-install-your.html)

Pre-Requisites
I am assuming that you are all done with the development and are now ready to deploy. In these examples I have a project name "FeedbackWP" that I need to deploy.Method - 1: Deploying through Visual Studio
Once the coding is complete, click on build > deploy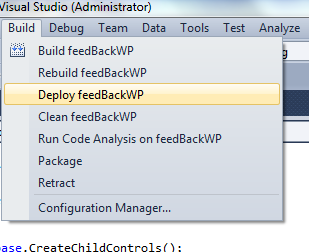
In the output window you should see the deployment success status.

For next steps please look at "After you webpart is deployed" section at the end of this post.
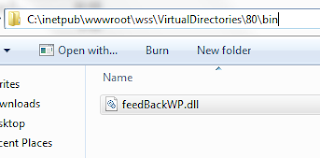
Method 2: Deploying by manually moving the DLL
Build the solution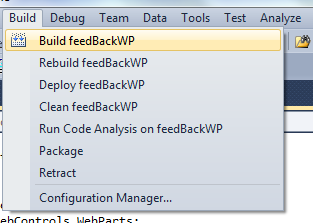

If no error returned by the compiler, copy the DLL from your project bin > Debug directory to the bin directory of your WSS site (C:\Inetpub\wwwroot\wss\VirtualDirectories\80\bin).
 >
> 

Go to (C:\inetpub\wwwroot\wss\VirtualDirectories\80\) and modify the Web.Config file for the WSS site to declare the custom web part as a safe control by adding the following code within the <SafeControls> tag.
<SafeControl Assembly="DLL-Name-Here" Namespace="DLL-Name . NameSpaceHere" TypeName="*" Safe="True" />
In my case my dll name is feedBackWP and the namespace of my webpart is InputForm; so my SafeControl entry looks like:
<SafeControl Assembly="feedBackWP" Namespace="feedBackWP.InputForm" TypeName="*" Safe="True" />
And my webconfig looks like the image below:

Now we need to add this webpart to our Sharepoint gallery.
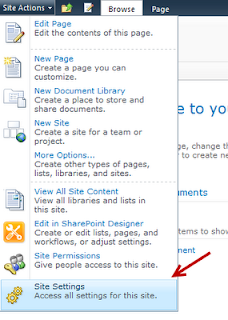
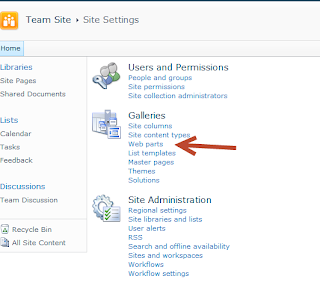
Click on Site Actions -> Site Settings -> Web Parts.
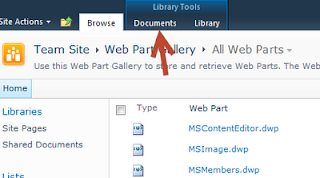
From Web Parts page click on Documents > New Document
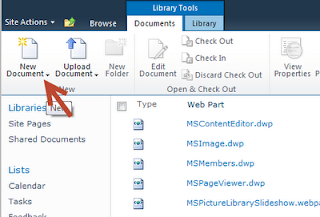
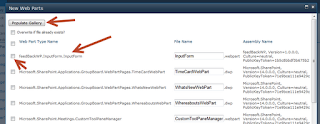
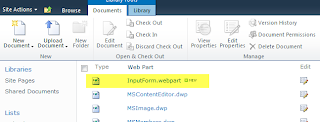
New Document will bring up a pop-up window. This window should have your new web part listed. Select your webpart from the list and click on Populate Gallery.
If the import is successful, you will see the web part in Web part gallery list.
For next steps please look at "After you webpart is deployed" section at the end of this post.


From Web Parts page click on Documents > New Document


New Document will bring up a pop-up window. This window should have your new web part listed. Select your webpart from the list and click on Populate Gallery.
If the import is successful, you will see the web part in Web part gallery list.

For next steps please look at "After you webpart is deployed" section at the end of this post.
Note: If you want to done some changes and want to update the webpart just update the dll in your wss bin directory
Method 3: Deploying by uploading WSP to SharePoint server
Build the solution
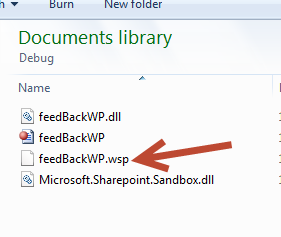
If no error returned by the compiler, you will have WSP file in your project bin > Debug.
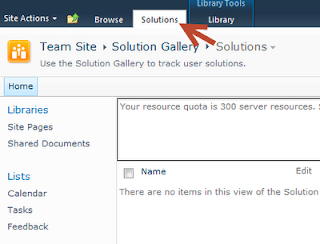
Open Sharepoint and click on Site Actions -> Site Settings -> solutions.

From solutions page click on solutions on top and after clicking it, you should see upload solution tab.
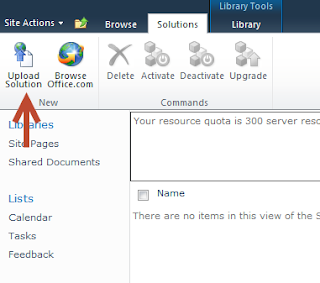
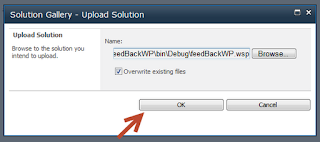
Click on upload solution and it will bring up a popoup to upload your webpart.

Upload your WSP file.
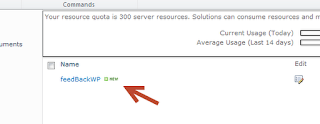
If uploading is successfull, you should see the webpart appear in the solutions list.
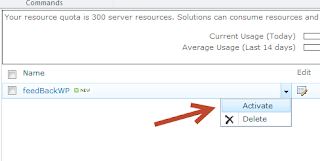
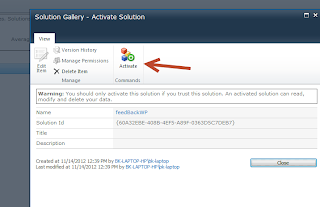
Activate the solution and thats it.
For next steps please look at "After you webpart is deployed" section at the end of this post.

If no error returned by the compiler, you will have WSP file in your project bin > Debug.
Copy the wsp file on the server and open up a command line and navigate to the 12-hive bin folder.
(my 12-hive bin folder is C:\Program Files\Common Files\Microsoft Shared\Web Server Extensions\14\BIN)
Enter the following commands :
stsadm -o addsolution -filename WSP FILE NAME WITH LOCATION
stsadm -o deploysolution -name WSP FILE NAME -immediate -allowGacDeployment -url SITEURL
Open Sharepoint and click on Site Actions -> Site Settings -> solutions.

From solutions page click on solutions on top and after clicking it, you should see upload solution tab.


Click on upload solution and it will bring up a popoup to upload your webpart.

Upload your WSP file.

If uploading is successfull, you should see the webpart appear in the solutions list.

Activate the solution and thats it.


For next steps please look at "After you webpart is deployed" section at the end of this post.
Method 4: Deploying through command prompt
Build the solutionIf no error returned by the compiler, you will have WSP file in your project bin > Debug.
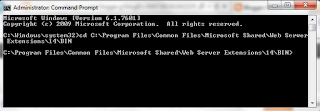
Copy the wsp file on the server and open up a command line and navigate to the 12-hive bin folder.
(my 12-hive bin folder is C:\Program Files\Common Files\Microsoft Shared\Web Server Extensions\14\BIN)

Enter the following commands :
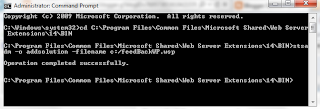
stsadm -o addsolution -filename WSP FILE NAME WITH LOCATION
stsadm -o deploysolution -name WSP FILE NAME -immediate -allowGacDeployment -url SITEURL
So in my case these commands become:
stsadm -o addsolution -filename c:/feedBackWP.wsp
stsadm -o deploysolution -name feedBackWP.wsp -immediate -allowGacDeployment -url http://bk-laptop-hp/
For next steps please look at "After you webpart is deployed" section.
After your Webpart is deployed
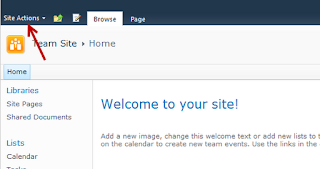
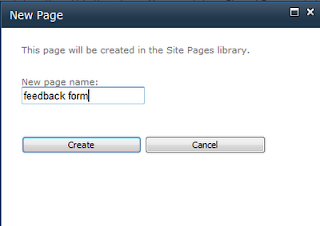
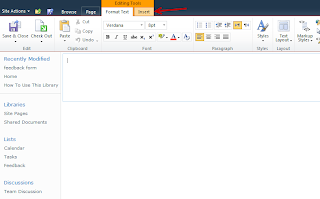
Go to the SharePoint site and click on Site Action > New Page.

From new page click on Insert and then on WebPart.

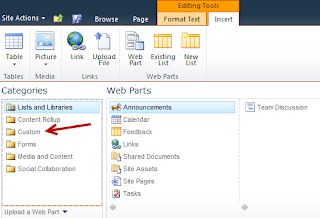
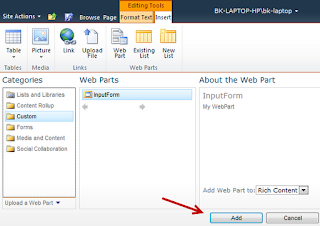
From WebPart list click on custom (NOTE: In some cases this is miscellaneous instead of custom). This should bring up our WebPart on the right hand side.
With the WebPart selected click on the add button.

For next steps please look at "After you webpart is deployed" section.
After your Webpart is deployed
Go to the SharePoint site and click on Site Action > New Page.


From new page click on Insert and then on WebPart.


From WebPart list click on custom (NOTE: In some cases this is miscellaneous instead of custom). This should bring up our WebPart on the right hand side.

With the WebPart selected click on the add button.

Your webpart will be there
Regards
Rashid Imran Bilgrami
Comments
Post a Comment