
Enabling Barcode In SharePoint 2013


Enable Barcode in SharePoint 2013
Wednesday, June 12, 2013


​To manage records and documents consistently and use record management application to handle physical records users need barcodes. We can identify the physical records corresponding to the digital objects using barcodes.

To enable barcodes in SharePoint 2013, go to Central Administration -> Security -> Configure Information Policy Configuration.


Select barcodes from the list.


Check barcode is enabled or not by checking the availability. Check "Resources" for the barcodes(letters or numbers).


In the Document library settings select "Information Management Policy settings" (Document Library settings -> Information management policy settings)


Check "Enable Barcodes" check box and save the settings.


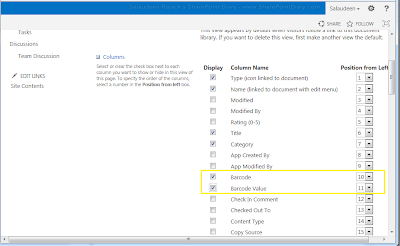
Modify your view and enable bar code
barcode in sharepoint 2010


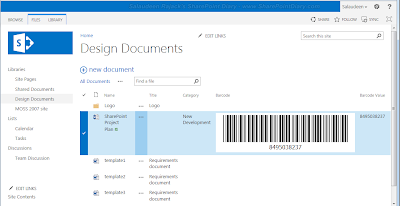
Upload any document. We can see the bar code for the properties of the uploaded file. Bar code was generated automatically so that we cannot have the options to change the barcode. We can change it thorough coding.


Comments

Popular posts from this blog

Content Query Webpart Template In SharePoint 2013 and add new column in it

Dear All, Here is the easiest way to make add custom column under your content query web part and then you can format it as you want. Step 1:  Open Sharepoint design Step 2:  Open site for sharepoint parent site collection Step 3:  Locate the following folder Style Library > XLS Style Sheets Step 4:  Open "ItemStyle.xsl"  file Add the custom style sheet as you want <xsl:template name="[Your Style Name]" match="Row[@Style='[Your Style Name]']" mode="itemstyle">                                                   <xsl:param name="CurPos" />                                                     <xsl:variable name="SafeLinkUrl">                                                       <xsl:call-template name="OuterTemplate.GetSafeLink">                                                         <xsl:with-param name="UrlColumnName" select="'LinkU

Updatepanel or Enable Ajax in SharePoint webpart

Dear All It is really giving me a hard to get this techniques if you want to run the update panel in sharepoint 2013 webpart then you need to initialize the script manage by code   protected override void OnInit(EventArgs e)         {             base.OnInit(e);             InitializeControl();             // Register the ScriptManager             ScriptManager scriptManager = ScriptManager.GetCurrent(this.Page);             if (scriptManager == null)             {                 scriptManager = new ScriptManager();                 scriptManager.ID = "ScriptManager1";                 scriptManager.EnablePartialRendering = true;                 Controls.AddAt(0, scriptManager);             }         } In ascx page you need to add the following  <asp:UpdateProgress ID="UpdateProgress1" runat="server">     <ProgressTemplate>         <h1>Your progress value</h1>     </ProgressTemplate> </asp:U

SharePoint: A Complete Guide to Getting and Setting Fields using C#

Original article https://social.technet.microsoft.com/wiki/contents/articles/21801.sharepoint-a-complete-guide-to-getting-and-setting-fields-using-c.aspx Introduction This article demonstrates how to set and get the various SPField types for a SharePoint list using C#. The examples demonstrated set and get fields from an item that belongs to a custom list. The custom list contains a number of fields, and all the fields are named based on the type of field they are. For example, there is a Text field, which has been named, textfield. This is depicted in the following picture:   Applies To The examples demonstrated below are tested with and apply to the following versions of SharePoint: SharePoint 2010 SharePoint 2013 Get the List, and the first SPListItem This is the basic code for getting an item. If the list has at least one item, the first item is retrieved, otherwise a new item is created. var web = SPContext.Current.Site.RootWeb; var list = web.Lists.Try