Reference URL
http://blog.karstein-consulting.com/2010/12/29/walkthrough-create-custom-sharepoint-2010-list-form-for-deployment-in-a-visual-studio-2010-project/
Walkthrough: Create custom SharePoint 2010 list form for deployment in a Visual Studio 2010 project
(This is part 1 of 2. See link below.)
Today I want to show you how to create a custom list form for deployment within a custom list template developed in Visual Studio 2010.
Download or update or modify my demo code on Codeplex.com:
http://spcustomlistformdemo.codeplex.com/
For me I was difficult to figure out this way. I could not find a good documentation about this topic so I’ll write ist – If you found another description please post a link in the comments below. Thanks!
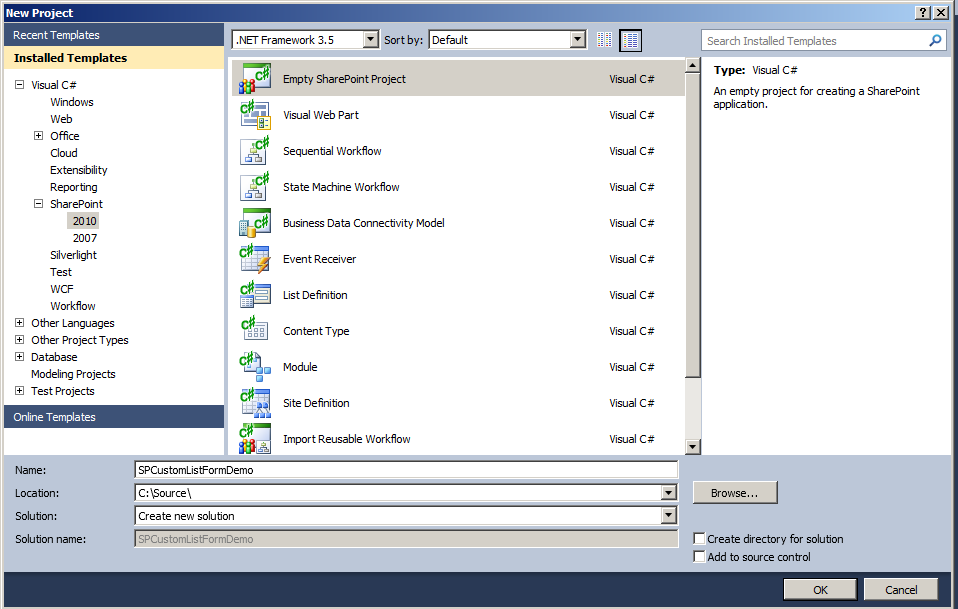
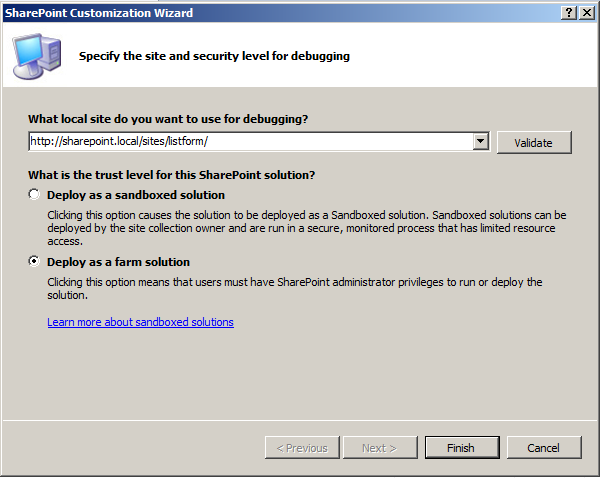
1. Create a Site Collection in your SharePoint 2010. Mine is called “http://sharepoint.local/sites/listform”
2. In Visual Studio 2010 create an empty SharePoint 2010 project.

Choose “Deploy as farm solution!”

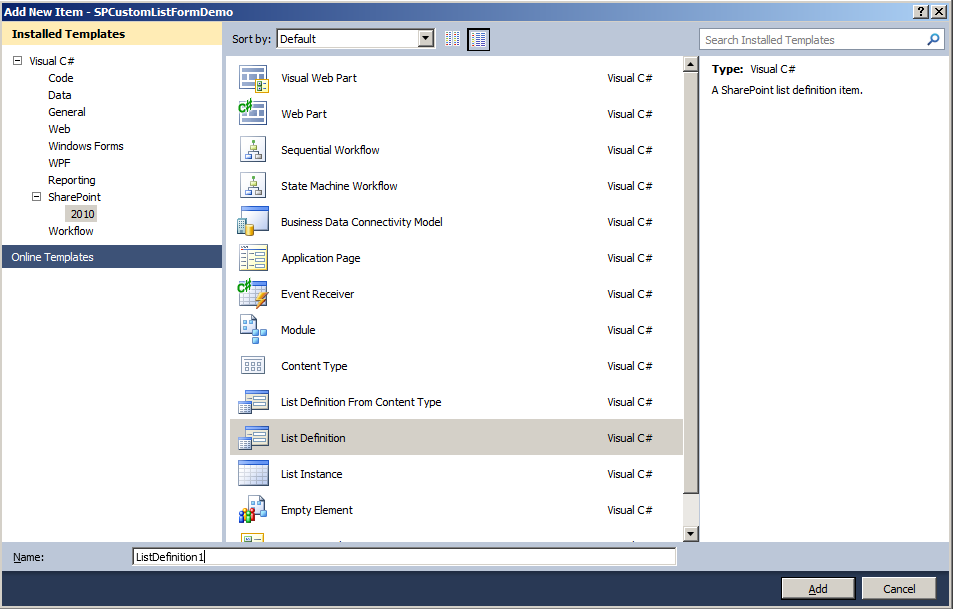
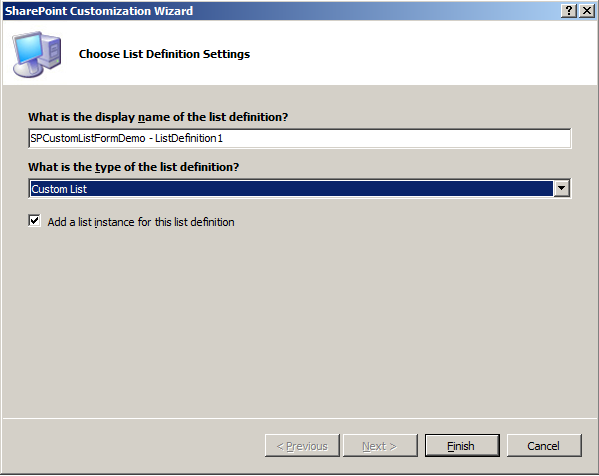
3. Add new item to you project: “List Definition” with type “Custom list” and with “Add a list instance”


4. Deploy this project “as is”.
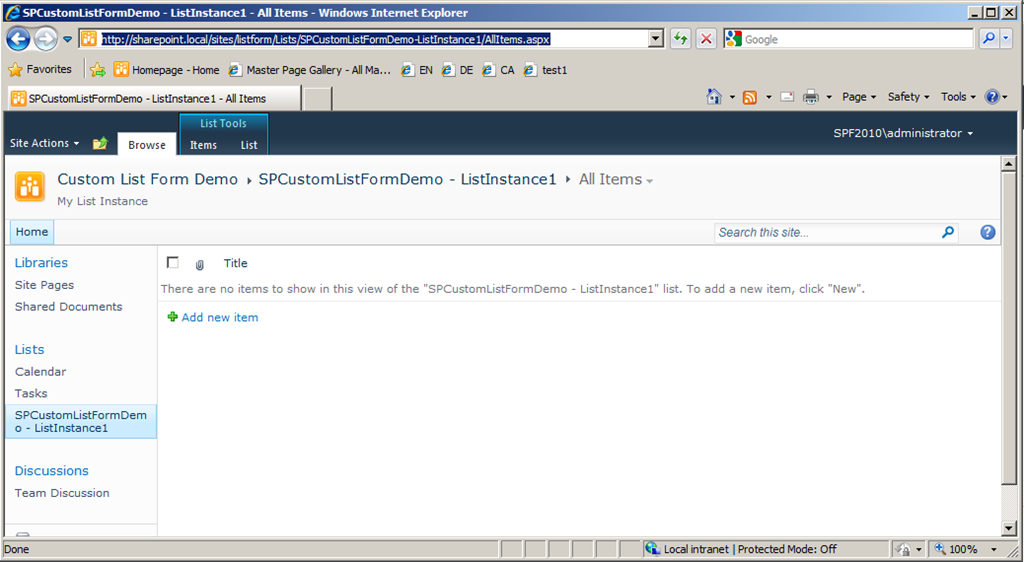
5. Have a look in your browser:

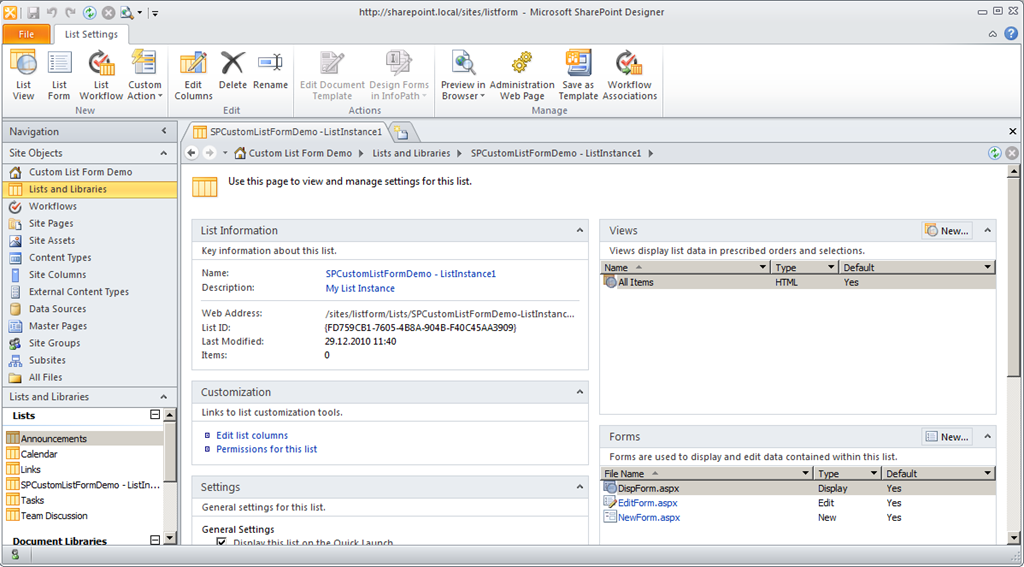
6. Open SharePoint Designer 2010 (SPD) and open the site “http://sharepoint.local/sites/listform”. Open the deployed list “SPCustomListFormDemo – ListInstance1”

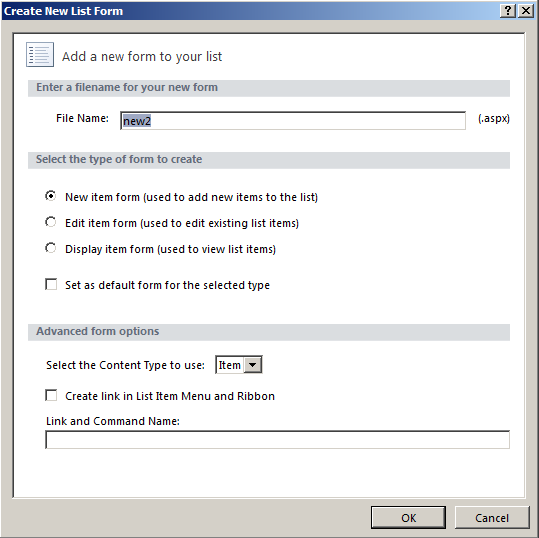
7. In the SPD in the List Settings of “SPCustomListFormDemo – ListInstance1” click the Ribbon tab “List Settings”. Then click “List Form”. You get this dialog:

Enter the name of the new list form, e.g. “new2.aspx”.
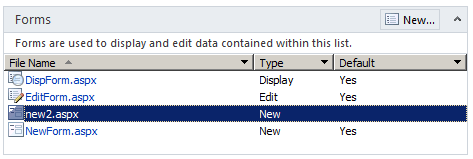
8. In SPD in the List Settings in the “Forms” view you can see your newly created list form.

Select it and open it for edit.
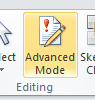
Click “Advanced Mode” in the Ribbon !!!

Select all the content of the new2.aspx file.
Copy the HTML code.
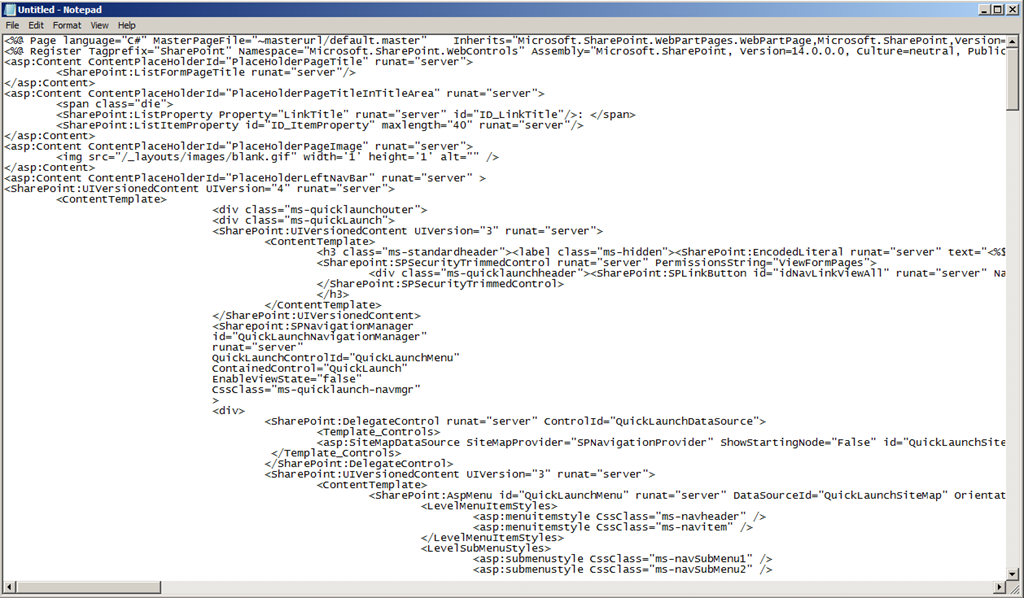
Open NOTEPAD and paste the HTML code.

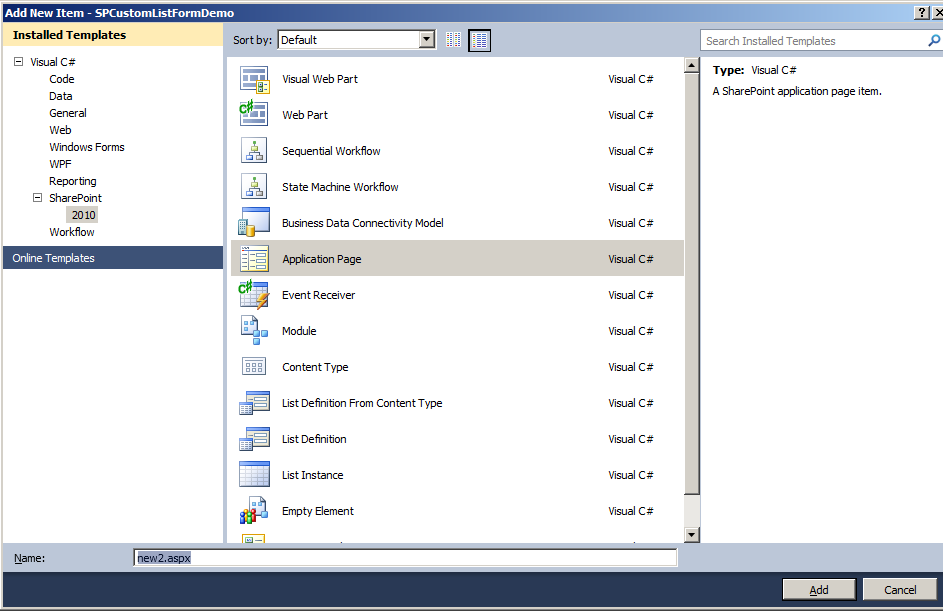
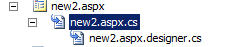
9. Go into your project in Visual Studio 2010. There add a new project item of type “Application Page”. Name it “new2.aspx”.

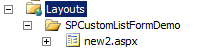
The page will be created in folder “LayoutsSPCustomListFormDemo”

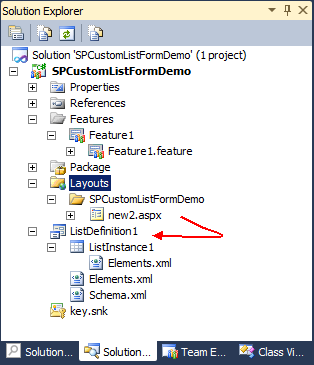
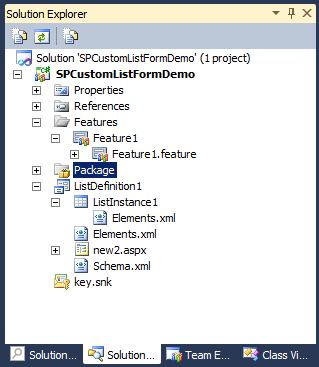
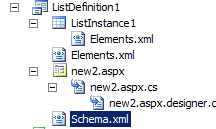
With “drag & drop” Move the new2.aspx note to your List Definition:

Remove the “Layouts” folder. You get:

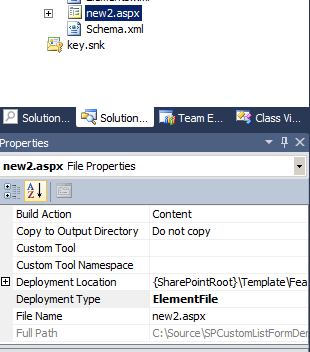
Select “new2.aspx” in the Solution Explorer and change its property “DeploymentType” to “ElementFile”

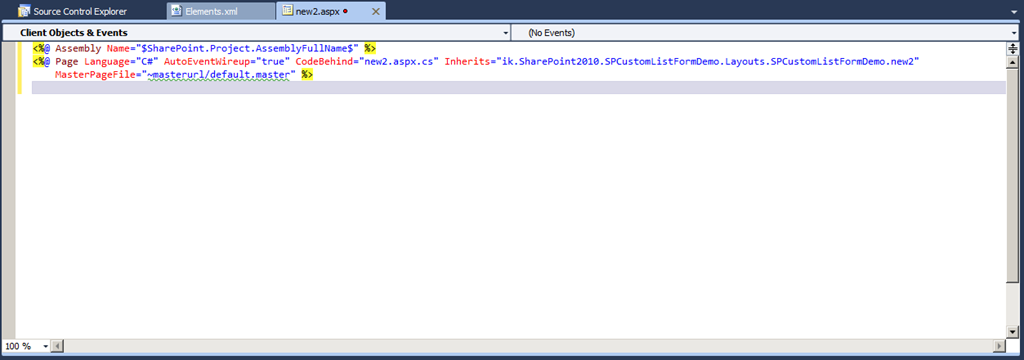
10. In VS2010 open “new2.aspx” for edit. Delete all content of the file except this two lines:

Replace the “DynamicMasterPageFile” attribute name through “MasterPageFile”. You get:

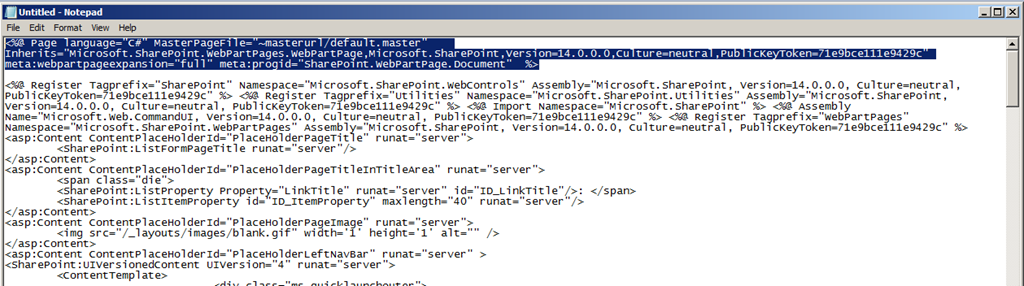
11. Got to NOTEPAD. Remove the “Page” tag as marked in the screenshow:

Select the rest of the file and copy it to the clipboard.
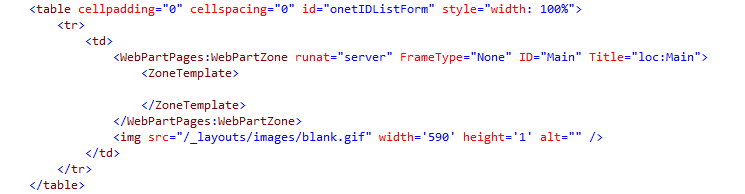
Now remove the complete content of the “ZoneTemplate” node. – Do not remove the “ZoneTemplate” node itself. Now the specific part of “new2.aspx” looks like this:

(There is a “DataFormWebPart” included in the “ZoneTemplate” node. This you remove by following the last step from above. But at runtime SharePoint will create a new DataFormWebPart in the Web Part Zone with ID “Main”. That’s the reason why we need to remove the copied and pasted Web Parts: It’s one of such a DataFormWebPart too much on the site after SharePoint creates the new one on runtime…)
12. In VS2010 paste the code into “new2.aspx”
13. Open “new2.aspx.cs” from the Solution Explorer:

Insert this “using”:

Replace the base type of your class definition from “LayoutsPageBase” to “WebPartPage”.
14. In the Solution Explorer open “schema.xml” of your list definition:

Scroll to the bottom of the file and find this part of XML code:

Replace the “SetupPath” attribute of the Form node with type “NewForm” with this value:features$SharePoint.Feature.DeploymentPath$ListDefinition1new2.aspx
You get:

15. Deploy your solution.
16. Go into the browser, reload the list and “add new item”.
Now your custom list form will be used!
The URL in the Browser is identically to the first try! Why is it “NewForm.aspx” and not “new2.aspx”?
-> SharePoint uses “NewForm.aspx” as page for “Add new item” but internally redirects to the defined “New Form” of the list.
You can add some code for demo purpose to help you identifying your custom list form. For that reason I inserted
<h1>Hello World</h1>
into the the ASP Content PlaceHolder “PlaceHolderMain”:

The final result:

Now you can do your own staff on your custom list form.
Part Two Your can check here
Regards
3art Technology Experts
http://www.3art.tech
http://blog.karstein-consulting.com/2010/12/29/walkthrough-create-custom-sharepoint-2010-list-form-for-deployment-in-a-visual-studio-2010-project/
Another post
http://www.ilikesharepoint.de/2013/11/sharepoint-create-custom-list-forms-with-visual-studio-part-1/Check out the other solution for 2013
http://www.ilikesharepoint.de/2013/11/sharepoint-create-custom-list-forms-with-visual-studio-part-1/Walkthrough: Create custom SharePoint 2010 list form for deployment in a Visual Studio 2010 project
(This is part 1 of 2. See link below.)
Today I want to show you how to create a custom list form for deployment within a custom list template developed in Visual Studio 2010.
Download or update or modify my demo code on Codeplex.com:
http://spcustomlistformdemo.codeplex.com/
For me I was difficult to figure out this way. I could not find a good documentation about this topic so I’ll write ist
– If you found another description please post a link in the comments below. Thanks!1. Create a Site Collection in your SharePoint 2010. Mine is called “http://sharepoint.local/sites/listform”
2. In Visual Studio 2010 create an empty SharePoint 2010 project.
Choose “Deploy as farm solution!”
3. Add new item to you project: “List Definition” with type “Custom list” and with “Add a list instance”
4. Deploy this project “as is”.
5. Have a look in your browser:
6. Open SharePoint Designer 2010 (SPD) and open the site “http://sharepoint.local/sites/listform”. Open the deployed list “SPCustomListFormDemo – ListInstance1”
7. In the SPD in the List Settings of “SPCustomListFormDemo – ListInstance1” click the Ribbon tab “List Settings”. Then click “List Form”. You get this dialog:
Enter the name of the new list form, e.g. “new2.aspx”.
8. In SPD in the List Settings in the “Forms” view you can see your newly created list form.
Select it and open it for edit.
Click “Advanced Mode” in the Ribbon !!!
Select all the content of the new2.aspx file.
Copy the HTML code.
Open NOTEPAD and paste the HTML code.
9. Go into your project in Visual Studio 2010. There add a new project item of type “Application Page”. Name it “new2.aspx”.
The page will be created in folder “LayoutsSPCustomListFormDemo”
With “drag & drop” Move the new2.aspx note to your List Definition:
Remove the “Layouts” folder. You get:
Select “new2.aspx” in the Solution Explorer and change its property “DeploymentType” to “ElementFile”
10. In VS2010 open “new2.aspx” for edit. Delete all content of the file except this two lines:
Replace the “DynamicMasterPageFile” attribute name through “MasterPageFile”. You get:

11. Got to NOTEPAD. Remove the “Page” tag as marked in the screenshow:
Select the rest of the file and copy it to the clipboard.
Now remove the complete content of the “ZoneTemplate” node. – Do not remove the “ZoneTemplate” node itself. Now the specific part of “new2.aspx” looks like this:
(There is a “DataFormWebPart” included in the “ZoneTemplate” node. This you remove by following the last step from above. But at runtime SharePoint will create a new DataFormWebPart in the Web Part Zone with ID “Main”. That’s the reason why we need to remove the copied and pasted Web Parts: It’s one of such a DataFormWebPart too much on the site after SharePoint creates the new one on runtime…)
12. In VS2010 paste the code into “new2.aspx”
13. Open “new2.aspx.cs” from the Solution Explorer:
Insert this “using”:

Replace the base type of your class definition from “LayoutsPageBase” to “WebPartPage”.
14. In the Solution Explorer open “schema.xml” of your list definition:
Scroll to the bottom of the file and find this part of XML code:

Replace the “SetupPath” attribute of the Form node with type “NewForm” with this value:features$SharePoint.Feature.DeploymentPath$ListDefinition1new2.aspx
You get:

15. Deploy your solution.
16. Go into the browser, reload the list and “add new item”.
Now your custom list form will be used!
The URL in the Browser is identically to the first try! Why is it “NewForm.aspx” and not “new2.aspx”?
-> SharePoint uses “NewForm.aspx” as page for “Add new item” but internally redirects to the defined “New Form” of the list.
You can add some code for demo purpose to help you identifying your custom list form. For that reason I inserted
<h1>Hello World</h1>
into the the ASP Content PlaceHolder “PlaceHolderMain”:

The final result:

Now you can do your own staff on your custom list form.
Part Two Your can check here
Regards
3art Technology Experts
http://www.3art.tech
Comments
Post a Comment